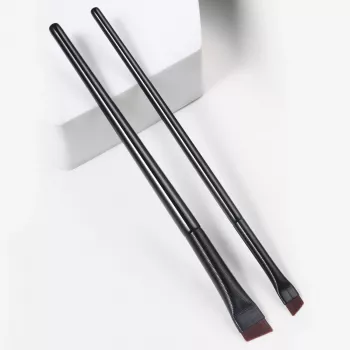
Ultra-Thin Blade Liner + Brow Brush Duo for Precision
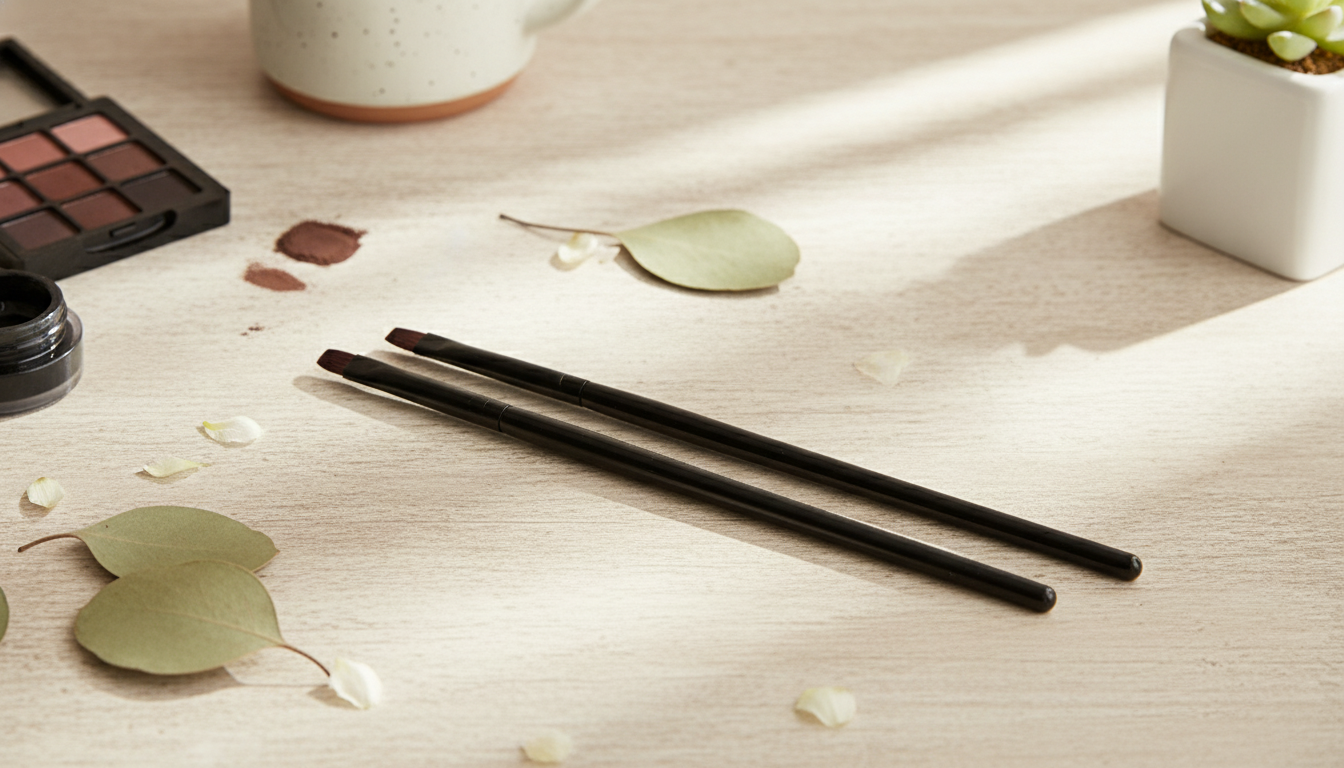
Ultra-Thin Blade Eyeliner & Eyebrow Brush Duo: Crisp Lines, Natural-Looking Brows
A precise eyeliner edge and a reliable brow brush can make everyday makeup faster and more consistent. This duo pairs a blade-style eyeliner tip for sharp definition with a brow brush designed to shape, blend, and refine. The result is cleaner wings, more believable hair-like strokes, and brows that look polished without looking heavy. For more guidance, see [PDF] PASSOVER MEDICINES & COSMETICS – STAR-K.
What This Duo Is Designed to Do
When liner or brows look “off,” it’s usually because small details are hard to control—like the outer wing angle, the inner corner, or a brow tail that suddenly looks too dark. A two-in-one tool built for precision helps solve those micro-problems without adding extra steps. For further reading, see Eyeliner Pen – LifePlus Health and Beauty.
- Create ultra-fine eyeliner details such as tightlining, inner-corner definition, and crisp wing edges.
- Support brow shaping by brushing hairs into place and softening harsh product lines.
- Improve symmetry by making small corrections easier (tail ends, arch definition, and wing angles).
- Reduce tool clutter with a two-in-one format suited for travel and quick touch-ups.
Key Features That Matter for Precision
Precision tools are less about “doing more” and more about placing product exactly where it belongs—then blending only where needed. This duo focuses on controlled placement on the liner side and controlled diffusion on the brow side.
- Ultra-thin blade-style eyeliner edge: helps place product exactly where needed, especially along the lash line.
- Brow brush side: useful for blending pencil/powder/gel and distributing product for a softer finish.
- Detail-friendly control: supports short strokes for a natural brow look rather than a solid block of color.
- Compact, multi-use layout: convenient for makeup bags and on-the-go routines.
At-a-Glance: Blade Eyeliner vs. Brow Brush Uses
| Tool Side | Best For | Technique Tip | Common Mistake to Avoid |
|---|---|---|---|
| Ultra-thin blade edge | Tightlining, wings, lash-line definition, inner corner | Use light pressure and build in thin passes | Pressing too hard and creating uneven thickness |
| Brow brush | Shaping hairs, blending product, softening edges | Brush upward at the front, then follow hair direction through the tail | Over-brushing after setting product, which can create patchiness |
How to Use It for Eyeliner (Beginner-Friendly Steps)
The easiest way to get a clean line is to stop trying to draw it in one pass. Think “stamp and connect”: tiny sections look smoother, and they’re much easier to correct.
- Prep: remove excess oil from lids and, if desired, apply a thin base to reduce skipping. (If you have sensitive skin or eyes, patch-testing and gentle removal habits matter—see guidance from the American Academy of Dermatology.)
- Start at the lash line: stamp or glide in short sections instead of one long stroke, keeping the blade close to the roots of the lashes.
- Build the wing: map the angle first, then connect the tip back toward the lash line. If one side is slightly different, fix angle before you add length.
- Refine the edge: use the thin blade side to sharpen corners and smooth tiny bumps without thickening the whole line.
- Balance both eyes: match wing angle first, then match length second for a more natural look.
If your liner transfers, let it set for a few seconds before opening your eyes wide. Also avoid layering too much creamy product in one go—thin layers set more evenly and stay sharper.
How to Use It for Brows (Natural, Hair-Like Finish)
Natural-looking brows are mostly about distribution: product concentrated where there’s less hair (usually the tail), and softness where there’s more hair (usually the front). The brush side helps keep the finish “hair-like” instead of “drawn-on.”
- Brush through first: move hairs into the shape intended before adding product. This shows exactly where you’re sparse.
- Fill strategically: focus product on sparse zones (typically tail and lower edge) and keep the front lighter.
- Blend immediately: use the brush to soften lines so the brow reads as hair, not pigment.
- Set the shape: after blending, do a final brush-through to ensure the brow lays neatly and evenly.
- Quick refresh: for midday touch-ups, brush to lift and re-align hairs without adding much more product.
For anyone using brow gels or long-wear formulas, keep basic product safety in mind and follow labeled directions and storage recommendations from the FDA cosmetics information page.
Who It Suits Best
Care, Cleaning, and Longevity Tips
Price and Availability
- Ultra-Thin Blade Eyeliner & Eyebrow Brush Duo — $4.47
- Women’s Soft PU Leather Rivet Backpack Large Fashion Daypack — a roomy option for travel days when you want to carry a full makeup kit comfortably.
- Shifting Seasons: Inspiring Quotes That Spark Life-Changing Moments (eBook) — a small add-on for a self-care refresh or gift bundle.
FAQ
Can this help with tightlining without making the line look thick?
Yes—use very light pressure and work in short strokes, staying between the lashes instead of drawing above them. Build slowly in thin passes so the result looks clean and defined rather than heavy.
What’s the best way to make brows look natural instead of drawn on?
Brush first to reveal sparse areas, then apply product only where needed and blend immediately. Keep the front lighter and place most definition through the tail for a soft, hair-like finish.
How often should the brow brush be cleaned?
If you use it daily, wash it about once a week, with quick spot-wiping between uses. After creams or gels, do a full wash sooner and let it air dry fully after reshaping the bristles.


Leave a comment